Sump Pump Installation Price in Washington: A 2025 Guide

Key Highlights

  • Expect to pay between $385 and $1,902 for sump pump installation in Washington in 2025.

  • Costs can vary based on the type of sump pump (submersible or pedestal), brand, horsepower, and additional features.

  • Labor costs in Washington for plumbers are influenced by location and the complexity of the installation.

  • Permits, code compliance, and inspections might be mandatory.

  • Consider extra features like battery backups for power outages and water alarms for added peace of mind.

Why Does This Matter?

Sump pumps are more than just a nice gadget to have. For a lot of people in Washington, they’re a lifeline against flooding, especially with all the rain we get. A basement sump pump keeps water from pooling in your basement floor and wrecking everything.


Knowing how much it’ll cost of installation—and what can influence that price—helps you plan better and avoid any surprises later.

What Affects Sump Pump Installation Costs?

Prices vary, but you need to know what factors into those numbers. If you want an exact price, you should talk to a licensed master plumber to get an estimate for your specific situation.


Here are some things that will affect the sump pump cost:

Type of pump

Do you want a submersible pump (usually quieter and more durable) or a pedestal sump pump (cheaper but not as powerful)?

Brand

Some brands are just more expensive than others, so keep that in mind.

Labor costs

The plumber’s hourly rate depends on your location in Washington and how complicated the job is.

Additional features

Backup sump pumps, new sump basins, and discharge pipes will all raise the price.

Why Sump Pumps Are Important in Washington

Let’s be real—living in Washington means rain. A lot of rain. Sump pumps are crucial if you don’t want your basement to flood and ruin your stuff. They direct water away from the foundation, preventing expensive water damage.


Ignoring basement floor flooding can lead to mold, structural damage, and a massive drop in your property value. Annual inspections and sump pump maintenance are a must, and it’s also important to know when to replace your sump pump before it gives out on you. Catching small issues like a float switch malfunction early will save you big-time sump pump repair costs down the road.

Average Price Range for Sump Pump Installation in 2025

While predicting the exact cost of sump pump installation is challenging, we can provide a general price range for sump pump installation in Washington for 2025. As a starting point, refer to the table below:

ServiceEstimated Price Range
New sump pump installation$385 - $1,902
Sump pump replacement$600 - $1,200
Battery Backup System$150 - $300

Bear in mind that these figures are averages and your actual project costs will be influenced by a number of factors, like the type of pump, the brand you opt for, if there are any extra labor fees involved, and whether you choose to have bells and whistles installed.

Average Price Range for Sump Pump Installation in 2025

Key Things That Affect Sump Pump Installation Costs

Many factors impact the cost of sump pump installation in Washington. Knowing these can help you plan your budget and talk more easily with the workers.


The type of pump you pick and the details of your property will affect the final price.

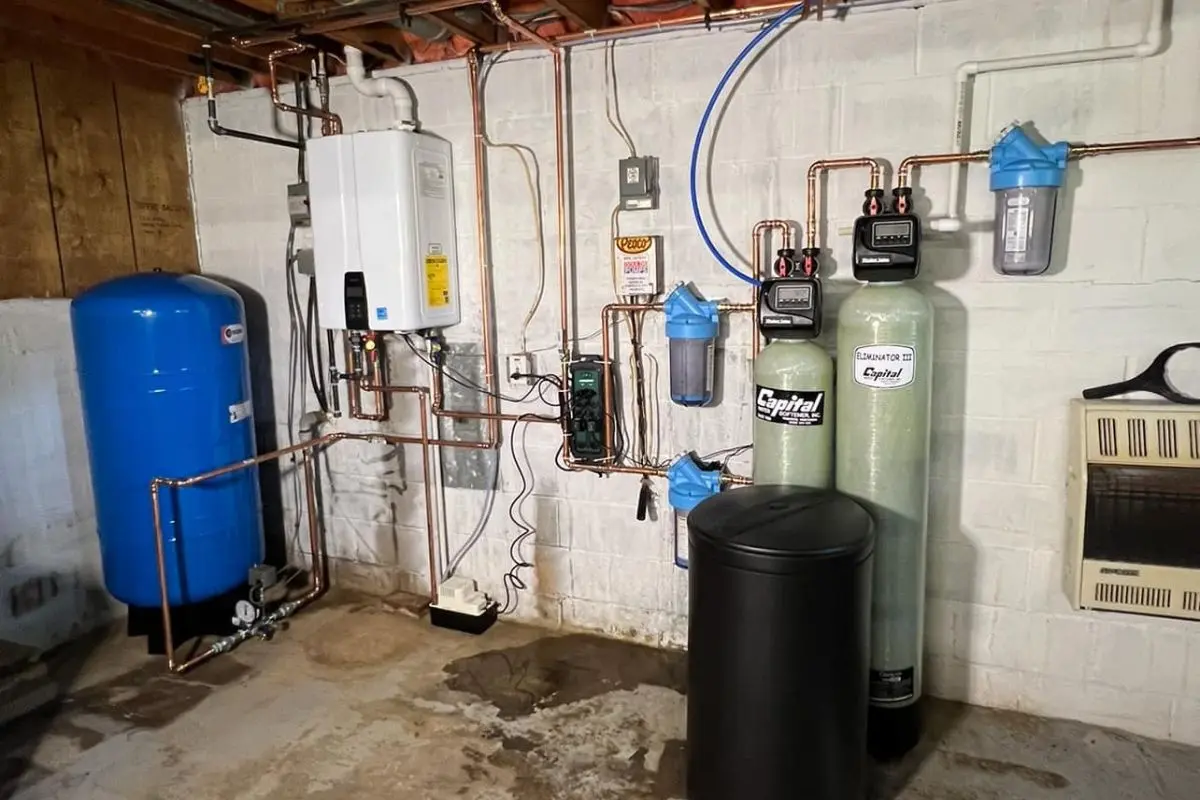
Types of Sump Pumps and Their Costs

When picking a sump pump, you need to choose between a pedestal sump pump and a submersible pump. A pedestal sump pump is placed above the sump pit. A submersible pump is designed to work fully underwater.


Submersible pumps usually cost more. They are quieter, stronger, and last longer. In places with heavy rain and frequent basement flooding, the extra cost often pays back with better performance.

Labor and Installation Fees

Labor is a large part of your installation cost. The price can change depending on where you are in Washington, how complicated the job is, and the plumber’s experience.


It’s important to hire a licensed master plumber who understands sump pump needs and installation. This way, the system will meet local codes and function correctly.

Geography’s Impact on Installation Costs

Washington has different types of land, and they affect installation costs. If your house is on a slope with an existing drainage system that works well, the installation is easy.


On flat land or where water does not flow well, the job could take more effort, which can increase costs. Other things, like how deep your basement is or if you have a dirt floor, can also change the price.

Permits and Local Codes

In Washington, you typically need permits and to follow code rules when installing sump pumps. These regulations help protect homeowners and guarantee safe use.


Talk about permits with your contractor. They will add these additional costs to their estimate and manage the needed paperwork.

Extra Costs You May Face When Installing a Sump Pump

When you plan your budget for sump pump installation, keep in mind that the initial price doesn’t show everything. Yes, the pump and labor are the main costs, but some additional expenses can appear and make the final total higher.


For example, you might need a sump basin and a discharge line to make sure the system works well. There are also optional extras, like backup power sources, that can give you peace of mind. You can think of them as the last touch that makes your setup more reliable.

Backup Power Systems and Water Alarms: A Sense of Safety

Nobody wants to think about bad things happening, but a backup power system and water alarms for your sump pump are smart ideas. They can help you feel better, especially when the power goes out during a storm. The backup keeps your sump pump working, stopping your basement from flooding. At the same time, the water alarm will alert you early if there is an issue. Yes, these features will cost a little more at first, but they will provide extra safety in the future.

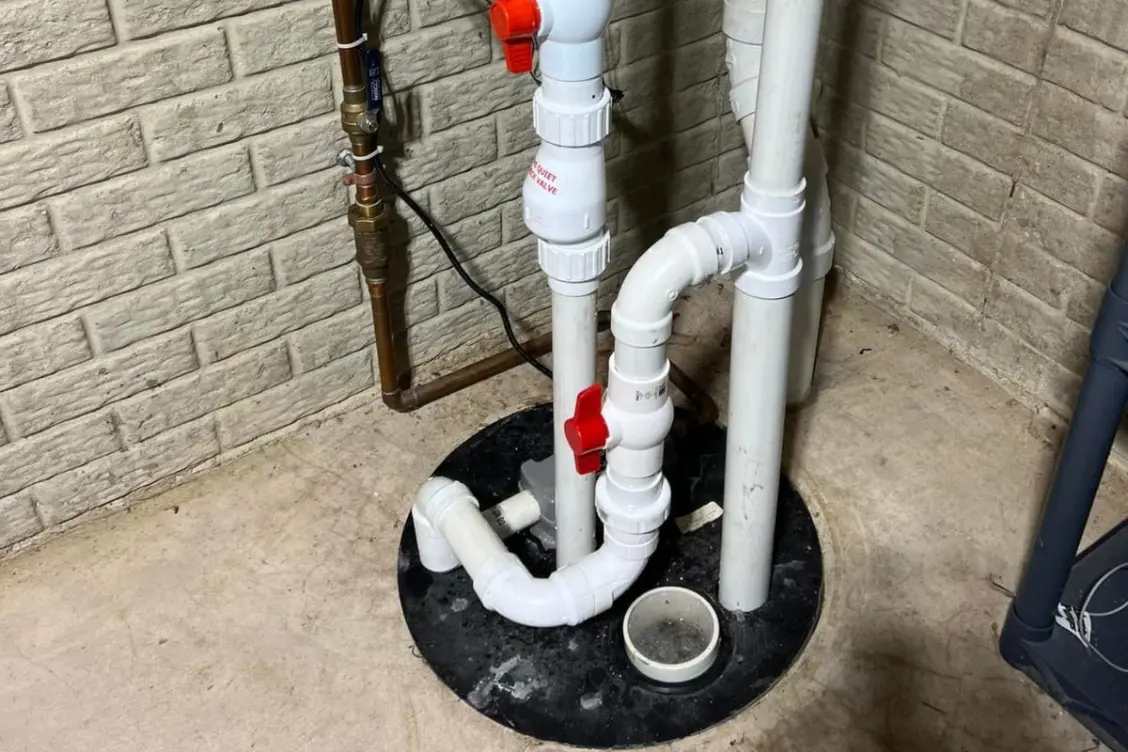
Sump Basin and Discharge Line: Important for Good Water Control

Another cost to think about is the sump basin and the discharge line. The basin collects water, so it’s important to choose the right size for the pump. The discharge line carries the water safely away from your home. If it’s not set up correctly, water could flow back into your basement. That’s a big issue. Both of these parts are necessary for everything to work well, even if you don’t see them doing their job every day.

DIY or Call the Pros? The Age-Old Question

Now, here’s the million-dollar question: should you attempt to install the sump pump yourself or hire a professional? Sure, some plumbing projects can be tackled by a handy homeowner, but this one usually isn’t worth the risk. If you’re not experienced with plumbing or sump pumps, you might want to leave it to the pros. After all, mistakes like leaks or pump failures can be costly, and nobody wants to pay for them.

When DIY Might Work

If you’ve done plumbing before, replaced a sump pump, and you’re comfortable with the work involved, then maybe DIY is a viable option. But let’s be real: even a small mistake can spiral into a big problem. So, if you feel unsure about any part of the process, take a step back and ask yourself—can I afford a flood in my basement because I didn’t want to hire someone? Better to make the smart call and have the job done right the first time.

Why You Should Go Pro

Choosing a professional for sump pump installation has many benefits. This is especially true in Washington, where the weather can change quickly. A licensed plumber has the right skills and knows the local rules. They also have the tools needed to complete the job correctly the first time.


Their experience makes sure everything is set up right. This helps cut the chance of leaks, bad drainage, or pump problems later. When you hire a professional, you are not just paying for help—you are getting peace of mind. You can feel good knowing your sump pump is being taken care of and your home is protected from water damage.

Conclusion

In conclusion, it is important for homeowners in Washington to understand the costs and factors involved in sump pump installation. Choosing the right sump pump for your home can help prevent water damage and protect your property. Whether you are thinking about DIY installation or hiring experts, always focus on protecting your home from water-related issues in the long run. Make sure you know the average price range, types of sump pumps, and labor costs. This will help you make a good choice that fits your budget and needs. Keep your investment safe and enjoy peace of mind with a dependable sump pump system.

About D.A. Nabhan Plumbing and Dave, the owner of D.A. Nabhan Plumbing Services

Need a reliable sump pump installed?

We’re here to help you keep your home dry and safe. At Nabhan, our team of expert plumbers in Washington will make sure your sump pump is installed correctly, so you can avoid water damage and flooding. Contact us today to schedule your installation!

got some questions in mind?

Sump Pump Installation Price - FAQs

How often should a sump pump be replaced in Washington?

A sump pump usually lasts around 7 to 10 years. However, in Washington, where it rains a lot, it’s smart to check it every year. Let a professional inspect it—they will see if it needs some care or a complete replacement. You don’t want to be surprised by a flooded basement.

You can definitely try to put in the sump pump by yourself. But it’s a bit like making a cake without a recipe—it might seem fine at first, but it could easily fall apart down the road. If you don’t know much about plumbing or if you have a small crawl space, it’s better to call an expert. They will ensure that everything is installed properly. This way, you won’t have any worries or water damage later.

A sump pump helps protect your basement from flooding. It directs water away from your home’s foundation, preventing it from getting into your living area. In Washington, where it rains a lot, it’s important to have a professional install it right. If you skip this step, you could end up with a flooded foundation, and that’s a big mess you want to avoid.

There are two main types: one is the pedestal, and the other is the submersible. Pedestal pumps sit above the sump pit. Submersible pumps go completely underwater. Pedestal pumps cost less but are less powerful. Submersible pumps work better in homes that get a lot of water or have regular flooding. Pick the pump based on what you need and the water level you want to manage.

A lot affects the cost. First, there’s the pump itself—on a pedestal or underwater, made of metal or plastic. Then, depending on where you live, the kind of floor you have, and the layout of your property, prices can change. Also, remember any permits you might need. It’s smart to get an estimate early so you won’t feel surprised when the bill arrives.

Water Heater Leaking? Here’s What You Need to Know

Water heaters are one of those appliances we tend to ignore until something goes wrong. But when you spot a puddle around your unit or hear an ominous drip, it’s hard to look the other way. A leaking water heater isn’t just an inconvenience; it’s a red flag that something’s amiss. Before we dive into solutions, let’s get a clear picture of what’s happening behind the scenes.

How Does a Water Heater Work?

First things first, let’s break down the basics. Your water heater is essentially a giant thermos with a job: heat water and deliver it to your faucets, shower, and appliances. Whether it’s a traditional tank model or a sleek tankless system, the core components are similar. There’s the tank (if you have one), heating elements, pipes, a pressure relief valve, and a drain valve.


Here’s the kicker: all these parts work together under pressure and high temperatures. Over time, wear and tear can cause connections to loosen, seals to fail, or the tank itself to corrode. Understanding how your water heater functions is the first step to figuring out why it might be leaking.

Is It Really Leaking? Common Signs to Watch For

Not all leaks are created equal. Sometimes, what looks like a leak might just be condensation—especially if you live in a humid climate. But how do you know when it’s the real deal? Here are some telltale signs:


Puddles or moisture around the base: This is the most obvious clue. If you notice water pooling around your unit, it’s time to investigate.


Rust or corrosion on the tank: Rust is a sneaky enemy. If you spot it on the tank or pipes, it could mean internal damage.


Unusual noises: Popping, cracking, or rumbling sounds can indicate sediment buildup, which often leads to leaks.


Reduced hot water supply: If your showers are suddenly lukewarm, it could be a sign your hot water heater is struggling—and possibly leaking.


The bottom line? Don’t ignore these warning signs. A small drip today could lead to further damage (and possibly a flood) tomorrow.

Why Is My Water Heater Leaking? Let’s Get to the Root

Now that we’ve covered the basics, let’s dig into the “why.” Water heaters don’t just spring leaks for no reason. Here are the most common culprits:

1. Age and wear: Like all appliances, water heaters have a lifespan. If yours is over 10 years old, it’s likely nearing the end of its run.

2. High water pressure: Too much pressure can strain your tank and valves, leading to leaks.

3. Loose or damaged connections: Over time, the pipes and fittings connected to your heater can loosen or corrode.

4. Faulty valves: The pressure relief valve and drain valve are common leak sources, especially if they’re worn out or improperly installed.

5. Internal tank corrosion: This is the big one. If the tank itself is corroded, it’s often a sign you need a replacement.

By understanding these causes, we can better diagnose the issue—and take the right steps to fix it.

So, there you have it: the inside scoop on what’s really going on when your water heater starts leaking. But don’t stop here—next, we’ll walk you through how to pinpoint the exact source of the problem. Because when it comes to leaks, knowledge is power (and savings)!

Old-Water-Heater-Maintenance

Water Heater Leaks 101: Everything You Need to Understand

When it comes to water heaters, I’ve seen just about everything—small leaks, serious drips, and even full-on floods. After spending years in the plumbing world, I’ve learned that understanding the basics of how your water heater works—and what might cause leaks—is the key to preventing some serious headaches. So, let’s roll up our sleeves and dive into the details.

How Does a Water Heater Work? A Plumber’s Breakdown

At first glance, a water heater seems like a simple machine, but every part plays a vital role in making sure things run smoothly. Let’s break it down:


  • The Water Tank: This is the main player in a traditional water heater. Made of steel and coated with glass to prevent rust, the tank holds the water that gets heated. Cold water enters via a dip tube, which sends it to the bottom, where it’s heated by gas or electric elements. The hot water rises and waits at the top, ready to flow out to your faucets.

 
  • The Pipes: Your water heater has two important pipes: one that brings in cold water (the inlet) and one that sends out hot water (the outlet). These pipes are often made of copper or PEX, and they’re connected to the tank with fittings that, over time, can become worn or loose.

 
  • The Pressure Relief Valve (TPR Valve): This valve is your water heater’s built-in safety feature. If the pressure in the tank rises too high—usually above 150 psi—it opens up to release some of that pressure. This prevents the tank from exploding, but it’s also a common culprit for leaks if the valve is worn out or damaged.


Understanding how these parts interact is more than just knowing some technical lingo—it’s essential for diagnosing and fixing leaks. Once you know how everything works, you’ll be in a better position to spot issues before they turn into big problems.

Is Your Water Heater Leaking? Here’s How to Tell

Leaks aren’t always obvious, and sometimes they’re sneaky. But there are a few clear signs to watch for:


  • Puddles or Moisture Around the Unit: This is the biggest red flag. If you see water pooling at the base of your water heater, it’s time to investigate. However, don’t panic just yet—sometimes, it’s just condensation, especially if you have a gas heater in a humid environment.

 
  • Rust or Corrosion on the Tank: Rust can be a sneaky troublemaker. If you spot rust on the outside of the tank, it often means the interior is also starting to corrode. This is especially common in older units or in areas with poor water quality or hard water.

 
  • Unusual Noises: If your heater starts making popping, cracking, or rumbling sounds, it could be a sign of sediment buildup at the bottom of the tank. Over time, this sediment can lead to overheating and cracks, which eventually cause leaks.

 
  • Reduced Hot Water Supply: If you’ve noticed that your showers are lukewarm or your dishwasher isn’t getting hot water, it might be because your heater is struggling or leaking. It’s worth taking a closer look before the problem worsens.


While these signs may seem minor, they’re your first warning system. If ignored, they could lead to a much bigger—and costlier—issue down the line.

Why Is My Water Heater Leaking? Let’s Dig Into the Causes

Let’s get to the bottom of it: why does your water heater leak in the first place? Based on years of experience, here are the most common culprits:


1. Age and Wear: No water heater lasts forever. Most traditional tank units have a lifespan of about 8-12 years. As they age, the interior lining of the tank breaks down, leading to corrosion and leaks. If your unit is pushing the 10-year mark, it’s a good idea to keep a close watch on it.


2. High Water Pressure: Your water heater can only handle a certain amount of pressure—typically 40-60 psi. If your home’s water pressure exceeds this, it puts a lot of strain on the tank, pipes, and valves, often resulting in leaks. A pressure regulator can help keep everything in check if your pressure is too high.


3. Loose or Damaged Connections: Over time, the fittings and connections that link your pipes to the heater can loosen or corrode. This is especially common at the inlet and outlet pipes, as well as the TPR valve. A quick tightening might help, but if corrosion is present, you’ll need to replace the fittings.


4. Faulty Temperature Settings: If your water heater’s temperature is set too high (above 140°F), it can cause excessive pressure buildup inside the tank, leading to leaks. I recommend setting the temperature to around 120°F—it’s hot enough for daily use and won’t overwork your unit.


5. Sediment Buildup: In places with hard water, minerals like calcium and magnesium can build up in the tank over time. This sediment acts as an insulator, making the tank overheat and eventually crack. Flushing your tank annually can prevent this issue from becoming a major problem.

damage water heater pipe

Finding the Leak: A Step-by-Step Guide to Pinpointing the Problem

When your water heater starts leaking, the first question is always, “Where’s it coming from?” Over the years, I’ve developed a systematic approach to diagnosing leaks, and I’m going to walk you through it step by step. By the end of this section, you’ll know exactly where to look—and what to do when you find the issue.

Is It the Pressure Relief Valve? Let’s Check

The pressure relief valve (also called the TPR valve) is one of the most common culprits when it comes to leaks. Here’s why:


What It Does: The TPR valve is a safety feature designed to release water if the pressure inside the tank gets too high (usually above 150 psi). This prevents the tank from exploding, but it also means the valve can wear out over time.


How to Test It:


1. Locate the valve—it’s usually on the side or top of the tank, with a discharge pipe running down the side.

2. Place a bucket under the discharge pipe to catch any water.

3. Lift the valve’s lever slightly to release a small amount of water. If water continues to drip after you release the lever, the valve is faulty and needs to be replaced.

4. If the valve is leaking from the sides or base, it could be due to a loose connection or a damaged seal. Tighten it carefully with a wrench, but if that doesn’t work, replacement is your best bet.


Pro Tip: Always replace a TPR valve with one that has the same pressure and temperature rating as the original. Mismatched valves can be dangerous.

Is the Drain Valve the Problem? Let’s Investigate

The drain valve, located at the bottom of the tank, is another common leak source. Here’s what to look for:


Signs of a Faulty Drain Valve:

– Water dripping from the valve itself, even when it’s fully closed.

– Rust or corrosion around the valve, which can indicate wear.

– Difficulty turning the valve, which might mean it’s seized or damaged.


Steps to Fix It:

1. Turn off the power and water supply to the heater.

2. Attach a garden hose to the drain valve and run it to a floor drain or bucket.

3. Open the valve to flush out any sediment that might be causing the leak.

4. If the leak persists, try tightening the valve with a wrench. Be careful not to overtighten, as this can damage the threads and lead to necessary repairs.

5. If tightening doesn’t work, replace the valve. Most drain valves are either brass or plastic and can be unscrewed with a pipe wrench.


Pro Tip: When replacing the drain valve, wrap the threads with plumber’s tape to ensure a tight seal and prevent future leaks.

Is the Tank Itself Leaking? Here’s How to Tell

If the leak isn’t coming from the valves or connections, the tank itself might be the issue. This is a more serious problem, but here’s how to diagnose it:


How to Identify Cracks or Corrosion:

– Inspect the exterior of the tank for rust streaks or wet spots. These are often signs of internal corrosion.

– Check the bottom of the tank for pooling water, which can indicate a crack.

– Look for bulging or warping on the tank’s surface, which suggests internal pressure damage.


When the Tank Is Beyond Repair:

– If your water heater tank is more than 10 years old and showing signs of corrosion or cracks, it’s usually not worth repairing. The internal lining is likely compromised, and patching it up is only a temporary fix.

– In this case, replacement is your best option. Trust me, I’ve seen too many homeowners try to salvage a failing tank, only to end up with a flooded basement.


Pro Tip: If you’re unsure whether the tank is leaking, dry the area thoroughly and place a piece of cardboard under the unit. Check it after a few hours—if the cardboard is wet, the tank is likely the source.

Are the Inlet and Outlet Connections to Blame? Let’s Take a Closer Look

The pipes connected to your water heater are another potential leak source. Here’s what to check:


Common Issues with Pipe Fittings:

– Loose connections: Over time, the nuts and bolts securing the pipes can loosen, causing small leaks.

– Corroded fittings: If you see green or white buildup around the connections, it’s a sign of corrosion.

– Cracked pipes: Inspect the pipes for visible cracks or splits, especially near the joints.


How to Fix Loose Pipe Connections:

1. Turn off the water supply and power to the heater.

2. Use a wrench to tighten the fittings on the inlet and outlet pipes. Be gentle—overtightening can strip the threads.

3. If the fittings are corroded, replace them. You’ll need to cut the old pipes and install new ones using compression fittings or soldering, depending on the material.

4. For cracked pipes, cut out the damaged section and replace it with a new piece of pipe.


Pro Tip: If you’re working with copper pipes, use a pipe cutter for a clean edge and flux before soldering to ensure a watertight seal.


By now, you should have a clear idea of where your leak is coming from—and what to do about it. But if you’re still unsure, don’t hesitate to call in a professional. Sometimes, a second pair of eyes can save you time, money, and a whole lot of hassle.

Leak Emergency: Quick Steps to Avoid Big Damage

When you notice a leak, don’t wait around. I’ve seen how a small drip can turn into a real mess if you don’t act fast. Let’s walk through what you need to do right away to protect your home—and your budget.


Step 1: Shut Off the Power—First Things First

Before you do anything else, the very first thing you need to do is turn off the power to your water heater. Water and electricity (or gas) don’t mix well, and things can get dangerous fast. Here’s how you can do it safely:


  • For Electric Water Heaters:

    1. Head to your home’s electrical panel (you’ll usually find it in the basement, garage, or utility room).

    2. Find the breaker that says “water heater” and flip it to the off position.

    3. If it’s not labeled, look for a double-pole 30-amp breaker, which is often what powers electric heaters.

    4. If you’re still unsure, use a voltage tester to make sure the power’s off before touching anything.


  • For Gas Water Heaters:

    1. Locate the gas shut-off valve, usually near the bottom of the heater on the gas supply line.

    2. Turn the valve so it’s perpendicular to the pipe to stop the gas.

    3. If you smell gas (like rotten eggs), leave immediately and call your gas company.


Pro Tip: If you’re unsure about shutting off the gas or power, just call a professional. Better safe than sorry.


Step 2: Cut Off the Water—Stop the Flow

Now that the power is off, your next step is to stop the water from flowing to the heater. Here’s how to do it:


  • Find the Shut-Off Valve:

    • If you have a tank-style heater, the shut-off valve is usually on the cold water supply line near the top. It’s often a lever-style valve (ball valve) or a round handle (gate valve).

    • If you can’t find it near the unit, check around the water meter or where the main water line enters the house.


  • Turn the Valve Off:

    1. For lever valves, turn the handle so it’s perpendicular to the pipe.

    2. For round handles, twist it clockwise until it stops.

    3. If the valve is stuck, use a wrench to gently loosen it—but don’t force it, as old valves can break.


  • Stop More Water Damage:

    • Place a bucket or container under the leak to catch any water still coming out.

    • If the leak is big, grab towels or a wet/dry vacuum to clean up any standing water.

    • Open a hot water faucet elsewhere in your house to relieve the pressure in the system and reduce the water flow from the leak.


Pro Tip: If your shut-off valve is hard to turn, it might be time to replace it with a ball valve. They’re more reliable, especially when you’re in a rush.


Step 3: Assess the Leak—Is It a Drip or a Flood?

Leaks aren’t always the same. Some are small and easy to handle, but others can quickly get out of hand. Here’s how to figure out what you’re dealing with:


  • Small Drips:

    • If the leak is just a slow drip from a valve or connection, it’s usually not an emergency.

    • Tighten the connection or replace the part causing the leak as soon as you can.

    • Keep an eye on it to make sure it doesn’t get worse.


  • Major Flooding:

    • If water is pouring out fast or quickly pooling, it’s a bigger issue.

    • Turn off the water and power right away (like we talked about earlier).

    • Call a plumber immediately—this is not a DIY job.


  • When to Call a Professional Right Away:

    • If the leak is coming from the tank itself, especially near the bottom.

    • If you see rust, corrosion, or bulging on the tank.

    • If you can’t figure out where the leak is coming from or how to fix it.


Pro Tip: Keep the number of a reliable plumber handy. In an emergency, you don’t want to waste time trying to find one.


By acting quickly and carefully, you can keep a small leak from turning into a big, expensive problem. Always remember, if in doubt, call a professional. Better safe than sorry!

To Fix or Replace? Your Ultimate Guide to Water Heater Decisions

Water heaters. We rarely give them much thought—until something goes awry. When your water heater starts leaking, the first question that hits you is: Can I fix it, or is it time to say goodbye? After decades in the plumbing world, I’ve encountered everything from minor leaks to total system failures. Let’s break down the options, so you can decide what’s best for your home and your wallet.

DIY Fixes for Small Leaks: When You’ve Got This

Not every water heater issue requires a pro. If the problem is minor and you’re comfortable with tools, you may be able to tackle it yourself. Here’s how to go about it:


  • Tightening Loose Fittings or Replacing Valves:

    • Tightening Fittings: Grab a wrench and carefully tighten the connections on your inlet, outlet, and drain valve. But, don’t overdo it—too much force can strip threads or crack the fittings.

    • Valve Replacement: If your pressure relief valve or drain valve is leaking, it might be time to swap it out. Start by shutting off the water and power, partially draining the tank, and replacing the old valve with a new one. Don’t forget the plumber’s tape to keep things sealed.


  • When DIY Works:

    • Small leaks around valves or connections are easy to address with the right tools and a little patience.

    • You’ve got the skills (or at least the right tools), and you’re feeling confident.

    • The heater is relatively new (less than 8 years old) and in decent shape.


Pro Tip: Keep a bucket, towels, and flashlight handy—things can get messy quickly, even with small jobs.

When to Call in the Pros: Don’t Push Your Luck

Some situations are beyond DIY repairs, and it’s better to call in a professional. Here’s when to pick up the phone:


  • Signs You Should Leave It to the Experts:

    • A leak coming from the tank itself, especially at the bottom.

    • Rust, corrosion, or bulging on the tank.

    • Unusual sounds like popping, cracking, or hissing, which often indicates something’s seriously wrong.

    • If you’re unsure of where the leak’s coming from or how to fix it.


  • The Benefits of Professional Help:

    • Quick Diagnosis: An experienced plumber can pinpoint the issue quickly, so you’re not left guessing.

    • Specialized Tools and Parts: Plumbers have access to the right tools and high-quality replacement parts.

    • Long-Term Fixes: Professionals provide lasting repairs, so you don’t have to worry about repeat issues.


Pro Tip: If you’re hesitating, ask yourself: What’s it going to cost if I mess this up? Sometimes, paying for a pro upfront saves you money in the long run.

Repair or Replace? Making the Right Choice

Deciding whether to repair or replace a water heater isn’t always clear-cut. Here’s what to think about:


  • Things to Keep in Mind:

    • Age of the Heater: Traditional water heaters typically last between 8–12 years. If yours is older and showing signs of wear, replacement is often the smarter choice.

    • Cost of Repairs: If the repair bill is more than 50% of what it would cost to replace the unit, you might want to skip the fix and go for a new one.

    • Recurring Problems: If you’ve been constantly patching up leaks or other issues, it’s a clear sign your heater is nearing the end of its lifespan.


  • Signs It’s Time for a New Water Heater:

    • The tank is leaking from multiple spots or is cracked.

    • Hot water runs out too quickly, or you’re always running out.

    • Energy bills are creeping up because the unit is no longer as efficient.

    • Your water heater is well over 10 years old and showing visible signs of aging.


Pro Tip: If you’re on the fence, ask your plumber for an honest assessment. A good pro will tell you when it’s time to replace, no sales pitch attached.

Choosing a New Water Heater: Tank vs. Tankless

So you’ve decided to replace your water heater. Now, it’s time to pick the right one for your needs. Here’s a rundown:

  • Tank vs. Tankless Heaters:

  •  

    • Tank Water Heaters: These are the classic units with a storage tank. They cost less upfront but tend to be less energy-efficient because they constantly heat water, even when you’re not using it.

    •  
    • Tankless Water Heaters: These heat water on demand, offering endless hot water and better energy efficiency. The catch? They cost more to install and may require upgrades to your home’s gas or electrical setup.


  • Energy and Sizing Considerations:

    • For Tank Heaters: Look for models with a high Energy Factor (EF) rating. Size matters too—a 40-gallon tank is enough for 3–4 people, but larger families might need a 50- or 80-gallon unit.

    • For Tankless Heaters: Check the Uniform Energy Factor (UEF) rating. You’ll also need to calculate your peak hot water demand to choose the right size, measured in gallons per minute (GPM).


Pro Tip: Thinking about going tankless? Have your plumber assess your home’s gas or electrical capacity before installing. Some homes may need upgrades to keep up with the extra demand.

By weighing your options carefully and understanding what’s going on inside your water heater, you can make the best choice for your home—and your budget.

Prevent Leaks Before They Happen: Tips for a Long-Lasting Water Heater

Let’s be real—no one enjoys the hassle of dealing with a leaking water heater. But here’s the silver lining: with a little care and attention, most leaks can be avoided. After years of fixing all kinds of plumbing issues, we’ve learned that preventative maintenance and a keen eye can make all the difference. The best part? Taking a few simple steps can prolong the life of your water heater and save you from expensive repairs. Here’s how to keep your unit running smoothly.


Routine Care: Your Water Heater’s Best Friend

Think of your water heater like a car—it needs some love every now and then to keep it in good shape. A solid starting point is flushing the tank once a year to remove sediment buildup. This stuff can cause overheating and, eventually, leaks. Here’s how to do it:


  1. First, turn off both the power and water supply to the heater.

  2. Attach a garden hose to the drain valve and direct it to a bucket or floor drain.

  3. Open the valve and let the water flow for 10 to 20 minutes or until it runs clear.

  4. Close the valve, refill the tank, and switch the power back on.


Once you’ve done that, take a look at the anode rod. This little part is your tank’s defense against corrosion. If it’s worn down by more than half or less than ½ inch thick, replace it. Also, test the pressure relief valve every six months. Just lift the lever—if water doesn’t flow or keeps dripping, it’s time to swap it out.


Pro Tip: If all this DIY stuff seems too much, schedule an annual visit from a plumber. It’s a small price to pay to avoid big issues later.


Water Pressure and Temperature: Finding the Sweet Spot

Your water heater runs best when both pressure and temperature are in perfect balance. Keep the pressure at 40–60 psi; anything higher can put too much stress on the system. You can check the pressure easily with a gauge on an outdoor faucet. If it’s too high, install a pressure-reducing valve (PRV) on your main line to protect your heater and pipes.


For temperature, aim for 120°F. That’s plenty hot for showers and dishes, and it won’t put unnecessary strain on the unit or risk scalding.


Pro Tip: Not sure about your home’s water pressure? Ask your plumber to check it during your next maintenance visit.


Watch for Warning Signs: Catch Issues Before They Blow Up

Sometimes, small problems go unnoticed—until they become big, expensive issues. Stay ahead of the game by checking your water heater for these red flags:


  • Rust or corrosion on the tank, pipes, or fittings—don’t ignore even a small patch.

  • Moisture or puddles around the base of the unit—this could mean a leak is developing.

  • Strange noises like popping, cracking, or rumbling usually point to sediment buildup or overheating.


If you spot any of these, take action immediately. Tighten any loose fittings, replace worn-out valves, and flush the tank to clear out sediment. Ignoring small problems now can lead to pricey repairs down the road.


Pro Tip: Keep a log of all your maintenance tasks—inspections, repairs, and replacements. It’s an easy way to stay organized and track the health of your old water heater.

Conclusion: Don’t Let a Leak Turn Into a Flood—Take Action Today

Let’s tie it all together with the essentials you need to keep in mind. A leaky water heater isn’t just annoying—it’s a red flag that something’s off. Maybe it’s a loose fitting, a valve that’s seen better days, or a tank that’s on its last legs. Brush it aside, and you could be staring at expensive fixes, water damage, or even safety risks.


Here’s the deal: Don’t wait. If you spot a leak, act fast. Cut the power and water, figure out what’s going on, and if you’re stuck, call in a pro. Those tiny drips? They can snowball into a major mess quicker than you’d expect. Tackling the issue early is always easier on your wallet than dealing with a disaster later.


But that’s not all. Stay on top of regular maintenance. Give your tank a good flush once a year, keep an eye on the anode rod, and test the pressure relief valve every so often. Watch your water pressure and temperature, and keep an ear out for strange noises or signs of rust. These little habits can stretch the life of your water heater and save you a ton of trouble.


And hey, if you’re ever unsure, call a pro. A skilled plumber can pinpoint the problem, suggest the right fix, and get things back in working order safely. It’s not just a repair—it’s peace of mind for you and your home.

Is your water heater giving you trouble?

At D A Nabhan, we’re all about keeping your home cozy and your water heater in top shape. With years of hands-on experience, we’ll figure out what’s wrong in no time and offer solutions that work—without breaking the bank. So why wait? Reach out to us today. Let’s keep the hot water coming!